K2 Pro
K2 Pro User Guide
Feb
Introduction
Thanks for choosing K2 Pro, the premium VR180 camera that deliver cinematic quality like never before. It is the state-of-the-art hardware combinations for the best VR180 experience: The large pitch size sensors ensure good sensitivity and better noise control; Wide dynamic range upto 16 stops and 10-bit color enable smoother color gradient; It can make high frame rate video upto 120fps for capturing fast motion in ever smoother way; The smart encoding codec in H.265, ProRes 422 HQ and ZRAW preserve your footage in the best suitable way; More importantly, it is equipped with a pair of tailor made premium fisheye made by iZugar, with ultra sharpness, no distortion and minimal chromatic aberration across the whole image field. All these come together in the K2 Pro for making the best possible VR180 production.
For the best experience you may want a good understanding of the camera capabilities before using it. Please read this user guide carefully, and seek technical support at vr@izugar.com if you need further assistance.
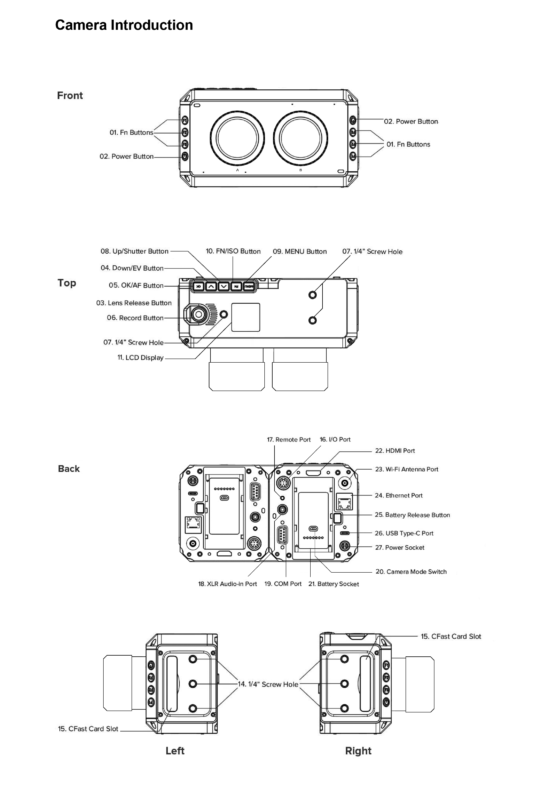
Inside the K2 Pro (pre-production edition) there are two modified E2 camera fitting in a single housing. Essentially they are two individual units connected via sync cable with co-ordinated controls. The basics are the same as the standard E2, you may refer to z-cam.com for more information. In this document we will focus on the specialty of the device. User manual of the Regular E2 can be found here: http://www.z-cam.com/wp-content/uploads/2019/10/Z-CAM-E2-User-Manual-draft-v0.6-FW0.89-.pdf
Peak Recording Performance
Thanks to the large sensor pitch size, the sensitivity of the sensor is really good, especially in the dark and at high speed. It has dual native ISO at 500 and 2500, and here are some of our recommendations:
In the dark
When shooting in Rec.709 we can have a very smooth image at ISO10000. There is also a professional de-noise utilities for desktop that can further reduce noise for your footage made with higher ISO. Anyway if you want the best image quality it is recommend to shoot at native ISO and record in Z-log2, and tune for the gain and color in the post production with the ZlogColor plugin.
Z Cam DeNoiser can be downloaded here: http://www.z-cam.com/software-update/
In high contrast
When shooting in high contrast scenario you may want better dynamic range to capture the bright and dark altogether. The Z-log2 and flat color mode offer upto 15 stops in dynamic range, whereas 13-stops for the Rec.709 mode. If you want to stretch it further you can use the WDR mode which can extend the dynamic range to 16 stops. It will be limited to Z-log2 and reduced the maximum frame rate.
(Menu → Video → WDR)
At high speed
We use the resolution 3696×2772 as our key video mode for VR180 shooting. The frame rate can be set upto 60fps. Care must be taken for the shutter speed and light flicking, as well as checking if extra lighting is needed to shine up the scene and control the noise. If faster shooting is needed, you can set the resolution to 4K and enable the variable frame rate (VFR), then you can set it upto 120 fps. However, due to the different aspect ratio the top and bottom of the output in VR180 will be clipped, leaving the vertical field of view to about 160 deg. In extreme circumstances when 160fps is needed, you may do it with the 4K 2.4:1 mode in VFR, but the vertical field of view will be heavily clipped and may not be suitable for usual VR180 purposes.
IPD and Stereo Safety Distance
For optimal VR180 production the sensor boards in K2 Pro have been rearranged at 64mm apart, which is the same as natural human eyes, as known as inter-pillar distance (IPD). If the IPD of the camera is wider, the comfortable stereo effect can only be happening at further away from the lenses. The minimum distance to the lens with acceptable stereo effect is referring as stereo safety distance. However by the laws of physics the stereo quality will be comfortable from 1 to 6 meters away from the lenses. Human eyes are likely seeing anything beyond 6 meters as 2D, and if anything coming too close we have to twist our eyes in order to focus, which may lead to eye strain or even invoke vomiting when the duration is long. With proper calibration a single iZugar MKX200 lens can be focus at just 2-inches away. However for a viewable stereo we would say 2-feet will be the minimum safety distance. If you really want to shoot closer than 2 feet, please shoot your object at the CENTER between two lenses and keep at lease 1-feet away to the camera, and you have to adjust the convergence in the post production (such as with MistikaVR, license not included). In case you really want to shoot within 1-feet, we would recommend you switch to 2D by just using the master unit.
Synchronized Control
A critical criteria for a good stereo camera is how good it can trigger the shutters together. Z Cam developed their precise sync system which is highly recognized by the VR communities for years. The synchronized control in K2 Pro (Pre-production edition) is more than just pulling the shutters together. With firmware v0.94 and later we can control the ISO, shutter speed and white balance in sync. However you should check the two units are shooting with the same video resolution, frame rate, codec, image profile and other parameters before pressing the record button.
Besides controlling WB and exposure manually we can also turn on the co-ordinated mode, so the slave unit can always have similar image as the master unit even if the master unit was set to auto. (Menu → Connect → Multi cam)
Camera Control
The right unit can be controlled with the buttons on the top of the device. However the left unit do not have such buttons and have to be controlled via mobile app or desktop controller.
Method 1:
Connect with Ethernet cable to a computer running the Z Cam Controller app, available at http://www.z-cam.com/software-update/
The default Ethernet connection mode is connected via a Router, so please connect your camera unit to a router/hub that is connecting to your desktop. A cat.6 network cable is highly recommended. Once the connection is ready you can see some light blinking on the Ethernet port on your camera. Then on the desktop Controller app you may click scan for camera, select it and you can have the full control.
Method 2:
Connect with the mobile app “Z Camera” , it is available in Apple App Store and Google Play. We recommend using a USB-C-to-lightning cable (not included) to connect the camera unit with an iPad (not included). The connection speed is much higher than with wireless and the delay of the preview is minimal, almost as fast as the HDMI output. If you wish to connect wirelessly, you have to enable the wifi function with a wired connection first. Please also note the device SSID name and the password (default password 12345678). Then back to your mobile device, select the camera SSID and login with password. When it is connected you can launch the Z Camera app.
Method 3:
You may also control your device with the Z Camera App on iPad/iPhone with an Ethernet cable with an Ethernet-to-lightning adapter. However the Ethernet connection mode have to be set as Direct mode with other connection method before it can be connected properly.
Method 4:
The camera come with an embedded web server. Connect your camera to a computer with Ethernet cable and set the connection mode to direct. Read the IP address of the device (normally it is 10.98.32.1). Then you can use a web browser to control the camera, with this link: http://10.98.32.1/www/html/controller.html
Audio
The K2 Pro pre-production edition is having two microphone on each unit, all on the front side of the camera, but the left set is inverted and locate at a higher position than the right set. For simplicity you may just grab the stereo audio from the master unit.
Since the two units are now fitted in a single body, the 3.5mm jack ports for audio-in and audio out have been removed. If external microphone is needed please record with external recorder and synchronize them with the internal recording in post editing. (update: the mini XLR connectors have been disabled by default)
Storage
The camera will show a red light if the recording media is not ready or full. When the storage is ready it will show a green light. The Z Cam team always recommend using Cfast card for recording your footage, and the Cfast card by Angelbird is their top choice. You may also record with SSD via the USB type-C port. We tested the Sandisk Extreme Pro 3.1 SSD, it can be used with most video mode, including the high frame rate mode. Please note the Z Cam team have been warning about the Samsung T5 SSD, which is slower and will have frame drop in your recording, so better avoid it.
How to Use the K2 Pro
(1) Camera Support
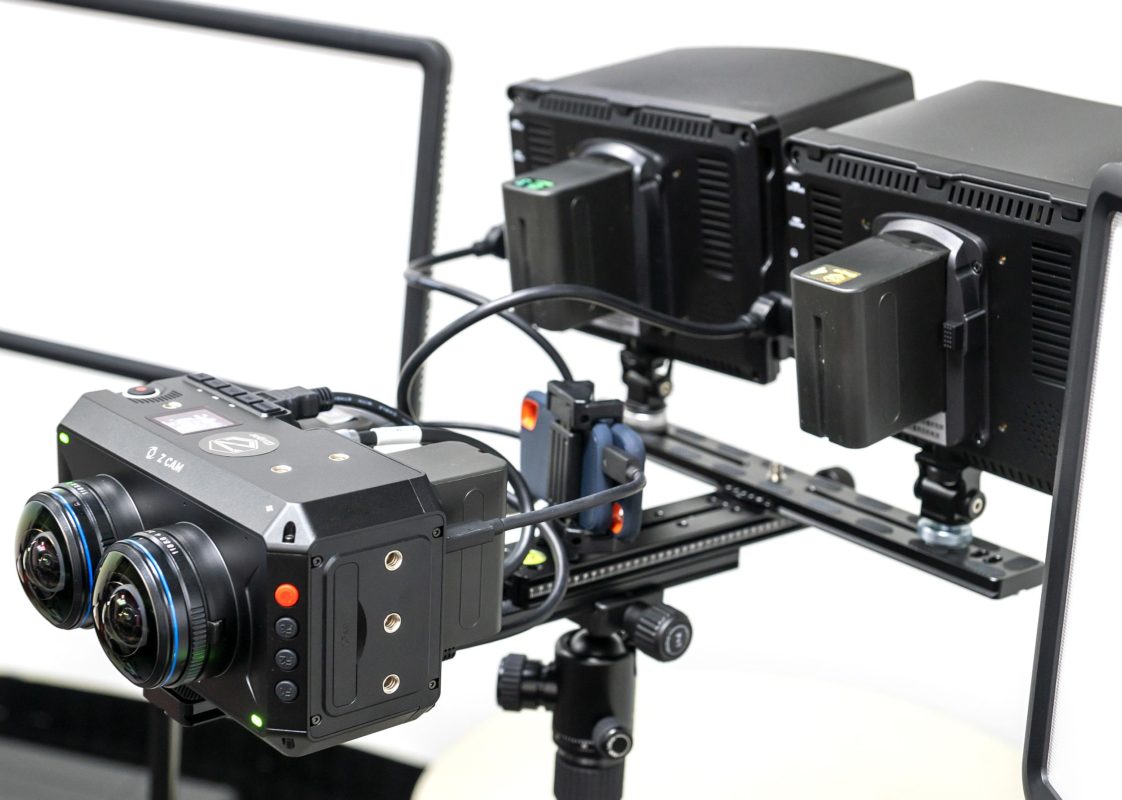
Before taking out the camera, please prepare a good supporting gear. With batteries, storage cards and optional field display(s) / controller(s), the weight of the rig may go over 3kg. Make sure your tripod and it’s head are good enough to hold the whole rig securely. Please avoid using monopod. In VR180, your audience will see everything in front of the camera, including the bottom. So if you simply put the K2 Pro on a tripod, the tripod legs will be visible in your output. You may put the K2 Pro on an extension rod or rail to push the lenses all the way to the front. We can still have a little of the legs in the preview, as we just need the 180 circle out of the 200 degree coverage.
(2) Put on the camera carefully, you may need some counter weight at the other end to balance the whole rig. You may want to set the device at the absolute horizon level, otherwise it may be challenging to align for stereo in post editing. You are advised to check the horizon balance on the top side of the camera, not at the edge of your tripod. A larger bubble leveler can be more reliable than those tiny one.
* (optional) Working with Gimbal
Stereo video require shooting at absolute horizon at all time, so if you want a moving shot you better shoot with a gimbal. However, the size and weight of the K2 Pro make it less friendly to mount. Luckily with a proper counter weight and offset plate we can use K2 Pro on some popular gimbals for DSLR, such as the DJI Ronin S, Moza Air 2 and Zhiyun Crane 3 Lab. The width of the camera is similar to the BMPCC4K/6K, so those offset plates for BMPCC 4K/6K will also work well with K2 Pro, such as this one: https://www.smallrig.com/smallrig-offset-kit-for-bmpcc-4k-and-ronin-s-crane-2-moza-air-2-bss2403.html
If you do not want to see the lower part of your gimbal in the output, you can set the camera further to the front and counter-balance with some counter weight on the back side. Using heavier batteries like NP-F970 may also help. https://www.smallrig.com/smallrig-counterweight-mounting-plate-for-dji-ronin-sc-bss2420.html
Anyway in locked mode the gimbal can eliminate most unnecessary movements and always keep the horizon for good stereo, but the vertical movement like up and down on a stair case cannot be stabilized. In this case a z-axis damping handle with dual springs can be used with your gimbal, which can make a walking shot more comfortable in 3D.
For panning shots, please try limiting to up-down movement and only do the left-right panning very slowly. The rolling shutter effect will be prominent if you pan left-right at high speed.
(3) Install the sync cable. We use a sync cable system to synchronize the units. On the back of the camera there is a Camera ModeSwitch (20) for multi cam operation. Make sure the unit on the right side is set as master (M) which can control the left unit as slave (S). If the switch were set to incorrect position the sync will not work. Plug the “Primary” head of the sync cable to the I/O port (16) of the master unit, and plug the “Secondary” end of the cable to the I/O port of the slave unit. (or if you are with the regular E2 sync cable, please check here: http://www.z-cam.com/wp-content/uploads/2019/07/Z-CAM-E2-Sync-Cable-Quick-User-Guide_final.pdf ). The recorded footage will always in sync, it doesn’t matter if the red led lights are blinking out of phase (The red light only shows when the recording media were not ready)
* Extra sync cable can be order at Alvin’s Cable.
(4) Insert your recording media. Qualified Cfast cards are highly recommended.
(5) Connect the controller for the left unit as suggested in the camera control section. Install antenna if wifi is needed. iZugar recommend using lightning USB cable to connect your camera with an iPad, the preview delay is almost as fast as HDMI, can double click to zoom and have full control to the camera.
(6) Connect the power. For studio shots you may connect the device to a A/C power. We tested a 12V5A power source can power up the two units together with a split cable. For outdoor shots you may use Sony NP-series batteries (not included). A pair of fully charged NP-F970 batteries may last for 3 hours, and please beware that high frame rate recording will consume more power. You may also connect each unit to a V-mount battery with the D-TAP port, or any stable 12V DC battery with the DC port on the D-TAP adapter cable.
(7) (optional) Connect your field display to the HDMI port (22). Enable OSD in the HDMI menu for easier status checking on the left unit. Use sun hook when necessary. If you have two field displays it would be easier to check across the two units. It is recommended to use two identical displays to minimize the color difference. (Menu → Connect → HDMI → Display Info)
For those displays with recording function are NOT suitable for K2 Pro as we are primarily shooting in 2772p, which is beyond the HDMI 2.0 protocol. For example if you try to record with an Atomos Ninja V via HDMI you will end up saving just 2160p instead of 2772p, which is a vast reduction in resolution and missed the sync between lenses.
You may also access to the live view with mobile app, however the resolution may be lower and can be laggy if it is connected wirelessly. You may double tap on the preview to zoom in for details. However, please make sure your mobile device is not set with any night mode that may change the white color to warmer color.
(8) Turn on the power by pressing the red button on both units. If you are on A/C power the unit will turn on by itself. If the storage is not available the status light will turn red and keep blinking until it is ready for recording. Sometimes the camera may report slow card warning or prompt for formatting, take actions as needed. When both status lights are green we can proceed to the next step.
(9) Set the time and metadata. We can assign a letter for each unit when formatting a media. For easier notation we can set the name of the right unit to R, and L for the left unit. You can sync the time between units by using the mobile app: Setting -> General -> More -> Other -> General -> Sync Date/Time. For ensure the smooth writing speed you are advised to format your cards before your job start.
* In case you mixed up the left and right side it is easy to distinguish: the right lens can see another lens on the left side, and vice versa.
(10) Set the same resolution and frame rate on the two units.
We must use the same resolution and frame rate on both units, otherwise the Record Buttons will not work. For VR180 we prefer shooting with video mode that can show most of the 180 imaging circle. Please use resolution mode at 3696×2772, 3696×2772 (low noise) or the 3312×2760. These mode can shoot upto 60fps. If you want to shoot in 120fps you have to use the 4K mode and enable variable frame rate (VFR), however as the aspect ratio is different the top and bottom part will be clipped a little in the VR180 output. The camera can also shoot at 160fps with the 4K 2.4:1 mode, but the vertical field of view is cropping too much, not recommended for VR180 shooting.
For VR180, exporting as 60fps can have smoother playback in VR headset. Speed higher than 60fps cannot be displayed in most VR headset. If you are shooting at 120fps or more, you may have to edit it as slow motion or export as 60fps.
Changing video resolution: Menu → Record → Resolution
Changing framerate: Menu → Record → project FPS
Changing VFR: Menu → Video → Variable Framerate
* Note for High FPS shooting:
Just like regular video, you may need more light or set the ISO to a higher value if you are shooting in higher frame rate. Having panel lights side by side of the camera can be a good solution to bring back the brilliant color and suppress noise. Be sure the shutter speed is faster than the frame rate, and also check for the light flickering.
(11) Set to the same Image Profile / LUT.
The color profile can be set as Rec.709, Z-log2, Flat and HLG. You may use Rec.709 for easier shooting, or you may shoot with better color and dynamic range with the Z-log2 or Flat (upto 15 stops). WDR mode can further extend the DR to 16-stops but can only be used with Z-log2. We would strongly recommend to set the same image profile on both units, otherwise if can be time consuming to match them in the post editing.
If you want to preview with accurate color on your field display when working with Z-log2 mode, you may download LUT files and install them on your display. Make sure the display is 10-bit capable. If you preview with mobile app you can select viewing with LUT. In post editing you can use the Z Cam color correction plugin to convert your color nicely just in a few clicks.
Download here http://www.z-cam.com/lut/
(12) Set to the same encoding codec.
The camera can set the encoder in H.264, H.265, ProRes 422 /LT /Proxy /HQ, and ZRAW. We do not recommend using H.264 as it is 8-bit only. H.265 can record 420 color in 10 bit, ProRes record 422 color in 10 bit, and ZRAW can record 12-bit raw. For usual shooting H.265 is recommended. For if you are looking for maximum room for color grading ProRes 422 HQ will be your better choice. ZRAW is a new feature, you have to convert the partial bayer info with the ZRAW VideoSuite before it can be edited with other software.
ZRAW Videosuite can be downloaded here: http://www.z-cam.com/software-update/
(13) Luminance Level, also known as the color range. When encoding in H.265 the camera allow you to select if you want to shoot with limited or full luminance. For the best recording quality we may want to shoot in full for capturing the widest data for maximum flexibility in the post editing. If you set the level differently it is difficult to match in the post editing.
(14) Expose your video properly.
The sync system can sync the manual ISO, WB and Shutter speed to the slave unit. If auto is needed you may turn on the Co-ordinated exposure and WB in the multi-cam menu. When it is enabled the master unit will check the exposure/WB of the first frame and then set a co-ordinated exposure/WB value to the slave unit. Since the fisheye lenses are seeing a very wide angle at 200 degree, the auto exposure are likely to have slightly different among the pair. It is normal to have different exposure in the first frame, and all the subsequent frames will have harmonized color. Such issue may be fixed by later firmware update, but for now it is easy to skip the first frame in post production.
If you don’t want the white balance or exposure changing in your recording, you can set a custom button to lock the AE or WB on the master unit. Press that button once before you start recording, the screen will show WBL or AEL for indication.
The aperture of the lenses can be set from f/2.8 to f/11, be sure to set them to the same stop. The position of the f/8 and f/11 are very close to each other and in some rare case the f/11 stop may not be in a lockable position, such as when the aperture ring have been distorted unexpectedly. In such situation you are advised to turn the aperture ring back and forth gently for a few times, the tiny spring-loaded steel ball inside the aperture ring shall able to get back on track again.
If you are on the mobile app you can turn on those assistive tools like the waveform or histogram to check your exposure. You may also check the exposure with meters that built in your field display.
(15) Rolling.
Double check if both status light are in green color. When you are happy with the exposure you are ready to start recording by pressing the record button on the master unit, or the record button on the mobile app / desktop controller. Press the button again when it is done. The segmentation of long footage can be set in the menu, default is at every 5 minutes.
Camera Maintenance:
- As the camera is a precise instrument, please do not flop it or let it suffer physical strike.
- As the camera is a non-waterproof of camera, please do not use it in water, or a humid environment, or get in touch with liquid. If water accidentally invades the camera, please shut it down, take off the battery (if any) and the memory card, and make the camera dry within 24 hours.
- As the camera’s heating range is 0-40°C, please do not place or use the camera in an environment where the temperature is lower than 0°C or higher than 40°C. The camera may heat up when it is recording. The metallic housing will serve as heat sink and the camera shall able to keep recording even if it is hot for your fingers. Avoid shooting under the Sun at high temperature for a long time, or the camera will switch off itself if the internal temperature is too high.
- Please do not let the camera and the already installed lens face the sun.
- Please do not remove the storage when writing or reading. It will damage the media and the camera.
- Please do not remove the sync cable when the camera is on or when recording.
- Please ensure the power is stable before recording. If either one of the battery going too low the recording will be stopped.
- Please do not connect with power over 14V, it will damage the camera.
- Please do not touch the lenses or move the focus ring in your shooting. It can be difficult to re-calibrate focus in the field without some proper tools.
- Please remove batteries and secure the lens caps when the camera is not in use.
- Please use soft lens cloth to clean the camera body regularly.
- Please do not use any detergent containing organic solvent to clean the camera body and the lens.
- Please only clean the lenses with soft tissues soaked with cleaning liquid.
- Please do not twist the aperture ring heavily or it may get distorted.
- Please do not disassemble the camera by yourself, and do not dismount the lenses or the limited warranty will be void.
- Please do not place the camera in a darkroom, a lab or other places where corrosive chemicals are stored.